Mt Suzu (1564m), Maebashi City, Gunma Prefecture, Monday, November 4, 2019

This was my third hike on Mt Akagi, also a dormant volcano and one of the three famous mountains of Gunma (the third one is Mt Myogi). Since it’s a hundred famous mountains of Japan, I knew that the bus from Maebashi station would be packed. Thankfully, they had an extra bus prepared, so everybody was able to sit during the one-hour trip – a good thing considering that the road had many sharp curves. I got off a few stops before the Akagi Visitor Center, at Shinzakadaira 新坂平, and took refuge at the nearby Akagi Tourist Information Center. It was cold and windy – a big change from the warm weather just 2 days ago.

Hiking on Mt Akagi 赤城山


Easy hiking among white birch trees

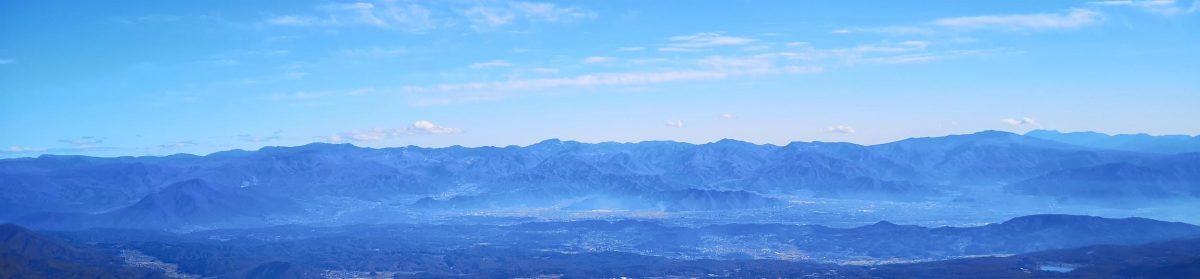
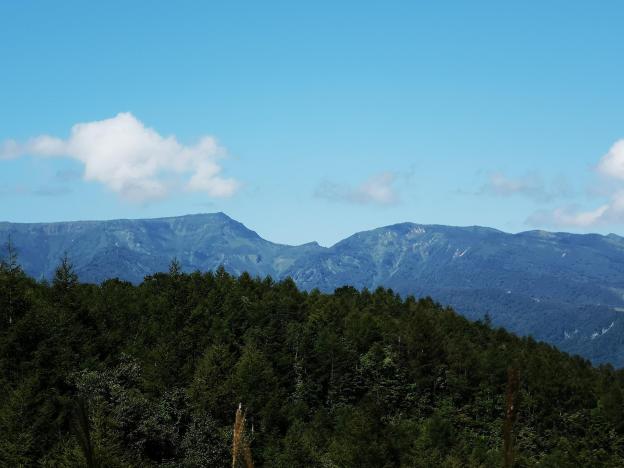
I had a quick look at the displays, which included a mounted bear, then had some coffee and toast for breakfast at the small cafeteria. At 10h30, I was ready to brave the near freezing conditions. The first part of the hike was on an easy path along a forested ridge. An hour later, I reached the highest point, Mt Kuwagara 鍬柄山 (1562m), where I had a fantastic view of the whole area. To the East, I could see the ancient caldera of Mt Akagi with Ono Lake at the center, and the highest point, Mt Kurobi, above. To the North, I could make out Mt Nikko-Shirane and Mt Sukai. To the West, was Mt Haruna, with Mt Asama looming behind. To the South was the round top of Mt Jizo with its TV antennas, another of Akagi’s peaks.

View of Mt Akagi’s main peak Mt Kurobi and Ono Lake

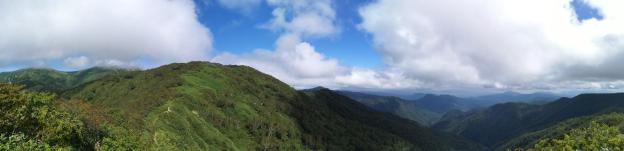
The next part was a steep but short slope bringing me to a saddle at the base of my target peak. The next part was an easy short scramble up a rocky path, aided by chains in a couple of sections. The trees were small and already completely leafless, so I was mostly in the sun. Those same trees blocked most of the view from the top of Mt Suzugatake 鈴ヶ岳, but they kept out the wind during lunch. By standing on a rock, I could make out Mt Kusatsu-Shirane between the trees, although the summit was hidden in the clouds.

The rounded forested summit of Mt Suzu

It was already past 1pm, so I quickly went back down to the same way to the base of Mt Suzu. My guidebook suggested continuing back the same way to my starting point, but since I had time, I decided to take a detour around Mt Suzu. It involved descending about 400 meters on one side, and then ascending the same amount on the other side, but I was feeling fit from all the recent hiking so I didn’t mind. On top of that, I was hoping to see some beautiful autumn colours and enjoy the solitude of a path few people hiked. The path was a bit hard to follow – I had to look out for the “yellow strips” – but from time to time a helpful signpost appeared in the middle of the forest.

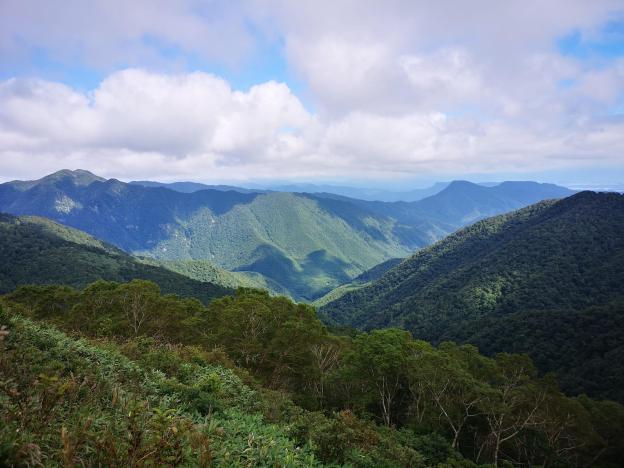
The autumn colours were at their peak

As I had hoped, the autumn colours were amazing, especially beautiful in the early afternoon sun – I felt like I was walking down an enchanted valley. To my left was a mischievous mountain stream, sometimes running above ground and sometimes under, the noise of rushing water alternating with silence. Thirty minutes later I reached the other end of Mt Suzu, where huge moss-covered boulders were mysteriously strewn throughout the forest, having apparently rolled down from above. Just beyond, I entered a larch forest, forming a wonderful orange ceiling above my head. I emerged onto a road half an hour later, and a little later I reached the lowest point of the hike, as well as the entrance of another section of the “Kanto fureai no michi” 関東ふれないの道, heading up a forested valley on the other side of Mt Suzu.

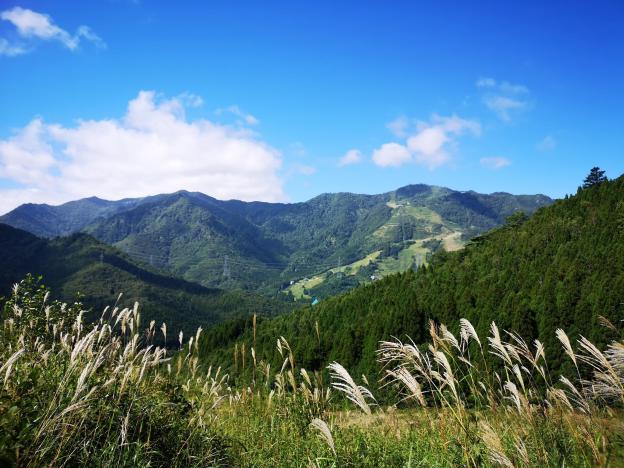
Mountain stream and autumn colours

Although the trail was now easier to follow, it was also in the shade, so it was harder to appreciate the autumn colours – it was much colder as well! At one point, the path met up with another stream. Apparently there were some waterfalls further up, but I didn’t have time to investigate. Soon I was climbing back up the side of the mountain. It was hard to make out where I was heading among the multiple folds of the mountain side, and for a while I wasn’t exactly sure where I was on the map. However, according to the ever useful signposts, I was on the right path.

The name “Akagi” can be translated at “Red Castle”

After going up what seemed like a never-ending wooden staircase, it was with relief that I arrived at Depari Pass, joining up with a path I had hiked previously on Akagi. It was nearly four o’clock and the sun was quickly dipping behind the side of the mountain. It took me another thirty minutes to reach the shore of Ono Lake and the bus stop just after sunset. Fortunately the bus back to Maebashi station was fairly empty, most people having taken an earlier bus back.

Mt Akagi mountain stream and crater lake

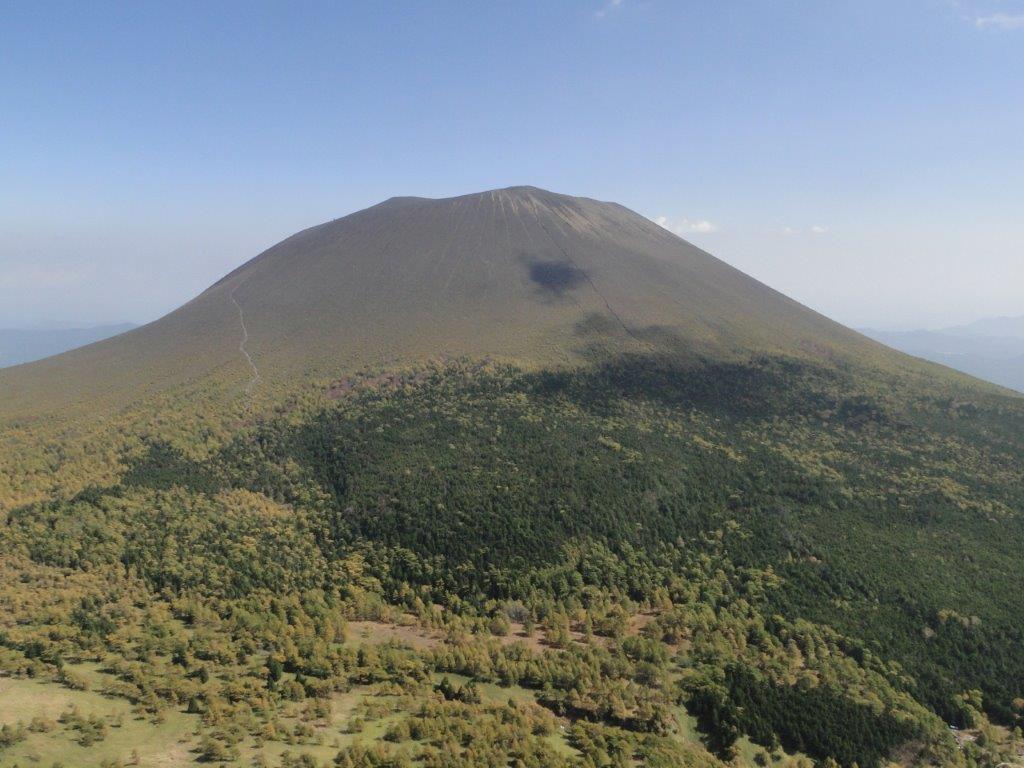
NEXT UP – Mt Kurohime (Togakushi Kogen) in Nagano


Mt Tengu (1179m), Takasaki City, Gunma Prefecture, Saturday November 2, 2019

Hiking on Mt Haruna 榛名山

This was my third hike on this dormant volcano, and one of the three famous mountains of Gunma. It’s also a popular sightseeing spot – there was a long line at the bus stop, opposite the West exit of Takasaki station. I got the very last seat, which was lucky since the ride takes one hour (halfway there, they added a second bus for those standing). It turned out that most people were visiting Haruna Jinja, a 1400-year old shrine located on the Southern side of the volcano. Most people got off at the shrine – however I continued all the way to the last stop at the shore of Haruna lake. Once off the bus, I was stunned by the reflection of Mt Haruna-Fuji on the blue surface of the lake.


This was my first time to see this Haruna lake under blue skies

The first part of the hike was down the side of the mountain along the “Kanto Furenai no Michi” (関東ふれないの道). The path had suffered a bit from the recent typhoons, but was still walkable. The autumn leaves were still at their peak, and looked great in the clear autumn weather. At one point I passed an interesting rock formation, that looked to me like a kind of giant monster. Less than an hour after setting out I reached Haruna Shrine which I had passed earlier by bus. I decided to follow the masses of people and check out the shrine. Although it seemed like your typical Japanese shrine, I was impressed by the massive cedar trees. After reaching the main building, I retraced my steps and located the start of the trail, up a road closed to cars near the massive gate marking the entrance to the shrine.

I happened to be at this strange rock just when the sun was shining from behind

The road soon narrowed; for a short while a stream passed over it – its passage underneath having been blocked by stones, no doubt due to the recent typhoons. The start of the hiking trail was marked by a small red “torii”. A few minutes later, I lost the trail. I backtracked a bit, and after scanning the surrounding forest, I managed to pick it up again (a signpost would be good here). A little further, there was a steep, but short slope that brought to the top of a ridge, and a fork. I first headed right to the top of Mt Kyodai (1079m) 鏡台山, completely surrounded by trees. I retraced my steps, and followed the left fork, which brought me to a rocky outcrop and a great panoramic view of Mt Asama and Mt Myogi to the West. After a short break, I headed back, and continued along a very enjoyable and mostly level path with few people.

Beautiful autumn colours on the side of Mt Haruna

Eventually I got to another fork. To the right, was a peak with no view. To the left, the path, running alongside a series of miniature “torii”, led to the true summit of Mt Tengu 天狗山, which I reached around 2pm. There was an excellent view of the Kanto plain to the South, a few meters past the summit. Unfortunately, as with the previous viewpoint, it was against the sun so it didn’t photograph well. I enjoyed the rest of my lunch, perched on top of one of the huge boulders at the viewpoint. My guidebook suggested going back the same way, but I decided to make a loop hike along a slightly longer, less traveled way, following the ridge above the trail I had come on.

Kissing rocks near the top of Mt Tengu

The entrance to this trail was hard to spot – there was a very small sign pointing the way through the bamboo grass, and the trail was very faint. I had to constantly search for “yellow strips” attached to trees. It was an exciting path with great occasional glimpses of the higher peaks of Mt Haruna to the East. However, it was also nerve-wracking, since I was alone on the trail, and I had to be careful not to lose my way. It was starting to get late, and I wanted to be sure to complete the hike before nightfall. On the way, I passed the minor peaks (but also highest peaks of the day) of Mt Kokanehara (1225m) 小鐘原ヶ岳 and Mt Okanehara (1252m) 大鐘原ヶ岳. After the second summit, the path descended quickly, and I was even more careful checking for the yellow strips – I didn’t want to have to climb back up like I had done the previous month in the Tanzawa mountains!

Late afternoon view of Mt Haruna in full autumn splendor

I was relieved to finally reach Jizo pass, where I turned left off the ridge and down into the valley. However the path remained difficult to follow with few signposts. Thanks to some judicious pathfinding, I got on to a good path next to a pretty stream and finally managed to rejoin the road I had walked up a few hours earlier. I was back at Haruna Shrine a little after 4pm, and I had ample time to catch the now mostly empty bus back to Takasaki station.

The birds of Mt Haruna – Swan gliding over the lake and Falcon flying in the sky above

NEXT UP – Mt Suzu (Mt Akagi) in Gunma

Mt Daigenta (1764m) & Mt Mikuni (1636m), Yuzawa & Minakami Towns, Niigata & Gunma Prefectures, Saturday, September 14, 2019

Hiking in the Mikuni Mountains 三国山脈

This update should belong to the Tokyo Wide Pass update for Silver week 2019, but since the second hike of that holiday fell through due to a combination of bad weather and a poorly-marked trail, I only managed one hike (a repeat of this year’s Golden Week). I was excited about this hike since it connects two prefectures, and two consecutive stations on the Joetsu Shinkansen. The staff at the ticket window were good enough to confirm that I wanted a return on the same day from a different shinkansen station! It’s also entirely within the Joshin’etsukogen National Park.

Gunma view from the top of the ridge connecting Mt Daigenta and Mt Mikuni

After arriving at Echigo-Yuzawa station in Niigata prefecture, I hopped on the bus headed for Naeba Prince Hotel, getting off at Asakai, a few minutes past the stop for Mt Sennokura. My plan was to hike up the ridge leading South from Mt Tairapyo, so that I could pick up my hike from 2017, about half an hour past the Tairapyo Mountain Hut. My map indicated that the hike went up through the ski resort but that the start of the trail was hard to find. I found something that seemed like a trail and headed up it, but after climbing for nearly thirty minutes, it turned out to be a deadend.

A hint of autumn, looking Westwards to Niigata

I was now faced with two options. Either head back down, and follow the road to the start of the trail of Mt Mikuni (where I had expected to end up) and go and back down from there. Or, cut across the hillside in the hope of coming across the actual trail. I chose the second one, following a very faint overgrown track through thick bushes at the edge of the forest covering the mountainside, thinking all the time that if this doesn’t work out, I’ll have to walk back the same way. Finally I gave up on the bushwacking, and started to climb directly up through the forest. It was pretty steep, but there was less vegetation to slow me down.

The ridgeline I was hiking up

After about ten minutes of climbing straight up the side of the mountain, using the thin trees as handholds, I spotted some rope to the right. I moved towards it, and discovered the path. My joy at finding the path, was tempered by the fact that it headed straight up the mountainside at roughly the same gradient I had been doing just before – the rope was there to help pull yourself up. The path continued for what seemed like forever. I finally reached a minor summit with a view of the remaining way to the top ridge. I had just started out, and I was already exhausted!

The instantly recognizable shape of Mt Naeba, as seen halfway up the ridge

After a short descent, the path continued to climb relentlessly. At precisely noon, I emerged at the high point, more than two hours after setting out, and completely knackered. This was after all my first big ascent since the start of the summer. I admired the great 360 degree view – Niigata to the West and Gunma to the East – then dropped my pack, and headed towards Mt Daigenta 大源太山 about 15 minutes away.

In the foreground Mt Azumaya (climbed May 2017) and in the background Mt Mitsumine (climbed May 2019).

From the top there were good views of Mt Sennokura playing hide and seek in the clouds. Further to the right, Mt Tanigawa was stubbornly sitting inside a big cloud. After a quick bite, I headed back to pick up my pack and started southwards along the ridgeline towards Mt Mikuni visible in the distance. Since I lost time finding the start of the trail, it was now impossible to catch the earlier bus which would have given me some time to use the hot spring at Sarugakyo Onsen. I had been there once before after descending from Mt Azumaya two years earlier and was looking forward to visiting again. Now I had to race to catch the last bus back.

Around 2000m, Autumn has arrived…

After some ups and downs, with spectacular views, especially towards Gunma prefecture, I reached the flat top of Mt Mikuni 三国山 just after 2pm. The name translates as “three country mountain”. In modern times, it sits on the border of two prefectures, but during the Edo period, it probably sat at the junction of three areas. From the top, I was able to see for the first time Mt Inatsutsumi, although Mt Shirasuna beyond was lost in the clouds. I could also see the end of the hike, straight down the side of the mountain to Mikuni Pass, and then further down the valley to Hoshi onsen 法師温泉, a secret hot spring.

Mt Ono (left) and Mt Haruna (right)

The path down to Mikuni pass consisted mostly of wooden steps – perfect for running down since I still wasn’t 100% sure I would be able to catch my bus. In no time, I reached the pass, where I turned left into the forest. Soon I reached a road, beyond which was the path to Hoshi Onsen, the last part of which followed a river. I reached the end of the hike with ten minutes to spare. Since there was no time for a bath, I used the Tokyo Wide Pass to go from Jomo Kogen back to Echigo-Yuzawa (just ten minutes), where there is a hot spring in the station.

Hoshi Onsen, a place I would like to stay at someday

NEXT UP: Mt Konara in Yamanashi Prefecture

Mt Mitsumine (1122m), Minakami Town, Gunma Prefecture, Monday April 29, 2019

A Kanto hundred famous mountain, this one has been on my list for a long time. For some odd reason, this hike isn’t featured in any of my hiking books, nor on any of my hiking maps. Fortunately I was able to find access information, and a basic hiking map online. It’s possible to do this as a station to station hike starting from Gokan station but the connection to the Joetsu line isn’t very good in the early morning hours. Since the return is via the Jomo Kogen shinkansen station, I decided instead to use the Tokyo wide pass during golden week, and start and finish there.

A good view of Mt Akagi from the North

Mt Mitsumine 三峰山 is a rectangular shaped mountain bordered by cliffs on the Eastern side. From Jomo Kogen station it looks like a ship. The official start of the trail is the parking area near Kawachi Shrine. I was surprised to see crowds of people at the shrine – they seemed to be celebrating some event. Just above is a jump-off point for paragliding. I’ve seen quite of few of these in Japan, but for the first time I got there while people were actually jumping off!

The jump-off spot for paragliders

I sat down for an early lunch and watched while these brave people jumped off one after the other, with Mt Akagi, Mt Komochi, Mt Onoko and Mt Haruna in the background. I was joined by a group of children. They weren’t as patient as me, and one of them yelled “hurry up” (hayaku) while the paraglider was waiting to jump! Finally the last one had jumped and I continued on my way. I was now on top part of the “rectangle” so it was mostly pleasant forest walking on a level path.

Some nice and easy flat-walking

At one point I reached a fork in the road and I had to make a choice: continue straight or make a detour via a couple of lakes or “numa”. I decided to check out the lakes since I wasn’t pressed for time. I wasn’t disappointed since the lakes were quite pretty. I was surprised to see some quite large fish swimming in the second one.

After returning to the main path, I found myself walking quite close to steep cliffs on my right side. There were occasional views of Mt Hotaka still covered in snow. The path bent left, then right, and after short climb a reached the highest point with a great view of the snow-covered Tanigawa range directly to the North. My map showed a path leading from the summit down to Jomo Kogen station.  This was Kanto hundred best #90.

Mt Hotaka still wearing its winter coat

Unfortunately it wasn’t a real path, and soon I was walking down the mountainside from yellow bit of rope to yellow bit of rope (used here instead of the usual pink ribbons). It was fairly hard to follow and I can’t recommend this to inexperienced hikers in Japan (if you don’t get the pink ribbon reference…) It seems most people do this hike by car and do a round trip to the summit. Plus, the weather had changed from sunny to overcast and I started to worry that it would soon start to rain.

It was still sakura season in Gunma

Eventually I emerged onto a forest road which soon turned into a road. On the way, I heard loud croaking noises coming from some water puddles – it was full of rather large-sized frogs. Unfortunately they were very shy and quickly hid under the mud. The end of the hike followed the road all the way back to Jomo Kogen station. Before heading back to Tokyo, I made a brief detour to Echigo-Yuzawa station where I could take advantage of the hot spring bath inside the station.

Watch a paraglider jump into the void!


Toad or frog? I couldn’t tell

The Tokyo Wide Pass – Why use it?

The JR Tokyo wide pass is arguably the best deal for hikers living in the Tokyo area. Unless you don’t mind shelling out a small fortune to ride the shinkansen or spending more time travelling to and from your destination than hiking there, the majority of your hikes will be limited to the Okutama, Tanzawa and Chichibu areas. That in itself is not such a bad thing – there are dozens and dozens  of excellent hikes in those areas and if you are just starting out you may not feel the urge to travel much further. However if you’ve been in Tokyo for several years and are yearning for something new, this pass will put dozens of new hikes in Gunma, Tochigi and even Niigata within striking distance.

View of Haruna lake - one example of a destination that can be reached as a daytrip using the Tokyo wide pass.
View of Haruna lake – one example of a destination that can be reached as a daytrip using the Tokyo wide pass.


BACKGROUND

The pass, first introduced in 2014, was originally called the Kanto 3 day pass and cost 8300 yen. However in December 2015 it was renamed the JR Tokyo wide pass and the price was increased to 10000 yen (a nice round figure for once) but now includes the Echigo-Yuzawa shinkansen station which gives access to multiple Niigata hikes – definitely worth the extra 1300 yen (also good for skiing in the winter).

THE PROS

You can get all the details on the pass on the website but the main attraction for hikers is  3 consecutive days of unlimited use of the shinkansen in the Kanto area. Even non-Japanese residing in in Japan can purchase it, unlike the JR Pass which is for tourists only – don’t forget to bring your passport when buying it. Japanese citizens can’t buy the pass (even if they live abroad) so unfortunately there is no affordable way for Japanese friends / family members to join you on this high-speed train binge. On the plus side, it includes reserved seating, a perk that won’t go unappreciated by tired hikers on the return leg. 

The original intent of the pass is the promotion of tourism in the Kanto area by having people go out there for 2 or 3-day trips using a variety of train lines. However I recommend hikers use it for two or three 1-day trips using the shinkansen every time – it is such a great deal that even if you only use it for 2 days you will be getting your money’s worth. Using other trains even limited express doesn’t really make sense in terms of time, money, comfort and convenience.  For example, a shinkansen round-trip from Tokyo to Karuizawa  costs about 10000 yen which is the cost of the pass so two 1-day trips is equivalent to a 50% discount and if you get lucky with the weather and can go all 3 days, you would only pay one third of the price – I’ve done this more than once. 

THE CONS

As much as I love the pass and rave about it to friends and acquaintances on every occasion there are a few points for improvement. First, the Tokaido line isn’t included. I hope they can make a deal with JR West since it’s only one hour away from Tokyo and there is a lot of great hiking in Shizuoka – Izu peninsula, Gotemba area near Mt Fuji, Minami Alps. The pass includes Shimoda at the tip of the Izu peninsula in Shizuoka  and also includes a ride on a private railway company to get you there so it wouldn’t be anything radical.

Next, buses aren’t included which is a shame since a lot of popular tourist destinations (such as Ikaho and Kusatsu hot springs) require a bus connection. A round-trip bus ride can tag on about 2000 to 4000 yen onto the total price. Since some buses are operated by JR that shouldn’t be a stretch. Finally you have to choose the start date when purchasing the pass. Since hiking is weather dependent I often buy the pass at the very last minute (the day before since the most sales locations don’t open till 10am) in order to get the latest weather forecast. If you can’t go on the chosen date for whatever reason (typhoon, sudden illness) you can’t get your money back.

Overall, I believe that the pros far outweigh the cons and in the next post I’ll give some suggestions on where to hike using the Tokyo wide pass.

Mt Asama (2568m), Komoro City, Nagano Prefecture, Saturday, October 12, 2013 [Map Available]

Hiking the hundred famous mountains of Japan 日本百名山

Hiking in the Joshin-Etsu-Kogen National Park

浅間山 (あさまやま asamayama)

Download a map of the Mt Asama hike

This map was developed for Japanwilds with the Hokkaido Cartographer

Find more Japan hiking maps on Avenza

View of the summit of Mt Asama from near Mt Kurofu

Mt Jingasa (1486m), Mt Yakushi (1528m), Mt Debari (1475m) & Mt Miharashi (1458m), Maebashi City, Gunma Prefecture

This hike follows the Western half of the caldera around Onuma lake 大沼 on Mt Akagi, passing several minor peaks opposite the highest point of this dormant volcano, Mt Kurobi 1828m (you can include it to make a longer hike). Mt Akagi is known as a hyakumeizan, and many people visit just to go up and down Mt Kurobi. However, like Mt Haruna closeby, there are many smaller mountains and hiking trails that are worth exploring (like Mt Suzu).

Hiking on Mt Akagi 赤城山

HOW TO GET THERE: Take the train to Maebashi (I took the shinkansen to save time), then a bus to the Akagi visitor centre. Some guy was handing out brochures about Mt Akagi to every person on the bus and, after we departed, was giving explanations about Mt Akagi through a microphone nearly the whole way. Slightly annoying but I still managed to doze off eventually (this doesn’t happen every time though).

The bus was pretty full and everybody got off one stop before the end. This was the closest stop to the lake. However the start of the Mt Akagi hiking trail is between that stop and the visitor stop (the terminus), so it doesn’t really matter where you alight.

Ask for a hiking map for Mt Akagi

THE ROUTE: It took about 30 minutes along the road from the visitor center to the Akagi campsite on the other side of the lake. The start of the hike was tricky to find – according to the map, the trail started before the camp site when actually it started from within, just behind the toilets. I had actually given up after walking up and down the road looking for any trace of a trail, and finally spotted it when I decided to go to the bathroom.

It was a nice signposted trail that quickly headed past a few holiday houses and then up the mountain. The lake is already at 1350m so there really wasn’t much climbing needed to get to the caldera ridge (around 1500m). The main trail went left, but I first walked about 50 meters to the right and got to a small rise called Mt Ashigara 1474m (足柄山) according to the map (there was no summit marker).

View from the summit of Mt Debari

I retraced my steps, circling the caldera counter-clockwise, and arrived at Mt Jingasa (陣笠山 jingasayama) with a summit marker and views of Mt Akagi. A little further on I reached the summit of Mt Yakushi (薬師山 yakushidake). There was really no one on the ridge which was amazing considering the amount of people on Mt Akagi. Afterwards, the path suddenly changed direction, heading over the ridge and down the other side. Mt Akagi has a jumble of peaks, and at times it can be a little disorientating. However very soon the path turned again into the right direction, and before I knew it I was on the top of Mt Debari (出張山 debariyama).

Mt Debari was the best summit by far with lots of places to sit, and some very nice views of Mt Kurobi and Lake Ono. After spending some time there I moved on and slowly started going down the caldera back to lake level. There were several paths going down to the left signposted to some nature house, but the correct path is straight ahead until a T junction. At this stage, I turned right towards the lake (the path heading down to the right is the Kanto Fureai no michi – see Mt Suzu above).

Mt Kurobi and Ono Lake

Eventually I reached the lake and walked along the road for about 20 minutes. With the sun in my back, it was a good place to take photos of Lake Ono. After passing some houses, I saw a sign for an observation platform going up a steep field on the right. After the steep climb the path became level, and after going through some forest, it took me to the treeless summit of Mt Miharashi (見晴山). There was an observation platform just a little down the path on the other side but the view was similar to the one observed earlier. The path continued a short way to the road from Maebashi.

View from the lake shore

On the other side of the road was the start of the trail for Mt Jizoh (1673m). I hiked it on a separate trip to Mt Akagi, but it makes a good extension if one has enough energy and time left. Today it was already late, so instead I followed a nice wide and mostly flat hiking path going around its base before connecting with the main road again. From there it was straight back to the bus stop. A few meters before the Akagi visitor centre 赤城公園ビジターセンター there was a nice wooden cottage that doubles as a restaurant. I popped in to get a snack, and was warmly welcomed.  I was invited to sit in front of the fire and offered hot tea.  A nice place to wait if there is some time before the bus leaves.

CONCLUSION: An easy but fun hike up and down some relatively obscure peaks with nice lake views, suitable for anyone who wants to get away from the crowds. The main drawback is that unless you climb Mt Akagi as well (or have your own car) you will have to walk along the road to reach the start of the hike.

Ask for a hiking map for Mt Akagi

View from the lowest peak of today’s hike